 Save to Pinterest
 My neighbor brought over a box of homemade Reese's cups last Christmas, and I watched her face light up when I took that first bite—it was that moment when I realized store-bought versions suddenly felt incomplete. There's something almost magical about the contrast between dark chocolate's subtle bitterness and that creamy, salted peanut butter center, especially when you've made it yourself in your own kitchen. That afternoon, she walked me through her process while we stood at her counter with melted chocolate dripping from spoons, and I knew I had to master this at home. Now whenever I make them, the smell of dark chocolate tempering brings back that feeling of possibility, that sense that homemade candy really does taste different than anything you can buy.
I brought a batch to my book club last month, and someone actually asked if I'd bought them from a fancy chocolatier—the kind of compliment that made all the careful tempering worth it. What struck me most was watching everyone slow down to actually taste them instead of just eating them, the way you do with homemade things that feel special. One friend said the salty element reminded her of her grandmother's candy-making days, and suddenly this simple recipe became something that connected to real memories and moments in people's lives. That's the power of making these yourself: they're not just dessert, they're a small gift you're giving to people.
Ingredients
- Dark chocolate (250 g, 70% cocoa or higher), chopped: Don't shy away from the higher cocoa percentage—it prevents the sweetness from becoming cloying and gives these cups a grown-up sophistication that feels worth the effort.
- Coconut oil (1 tbsp, optional): This is my secret for melted chocolate that stays glossy and smooth; it helps prevent that grainy texture that can happen when you're tempering.
- Creamy peanut butter (120 g, unsweetened and unsalted preferred): Check your label carefully here because the unsweetened versions make all the difference in the final balance of flavors.
- Unsalted butter (2 tbsp, softened): The softened butter is crucial—it blends into the peanut butter without creating a greasy filling, so take it out of the fridge about 20 minutes before you start.
- Powdered sugar (60 g, sifted): Sifting might feel fussy, but it prevents lumps that can make your filling grainy, and the effort takes maybe 30 seconds.
- Fine sea salt (¼ tsp): This small amount is what makes people lean in and ask what you did differently; it amplifies both the chocolate and peanut butter without announcing itself.
- Vanilla extract (½ tsp): A small amount rounds out the filling and prevents it from tasting one-dimensional, adding depth without being identifiable.
Tired of Takeout? 🥡
Get 10 meals you can make faster than delivery arrives. Seriously.
One email. No spam. Unsubscribe anytime.
Instructions
- Prepare your workspace:
- Line your mini muffin tin with paper liners and have everything within arm's reach—this is a recipe where organization saves you from mistakes and frustration.
- Melt the chocolate carefully:
- Whether you're using a double boiler or microwave, the key is patience: heat the chocolate in short bursts and stir between each one, watching for that moment when it shifts from chunky to smooth and silky. If you rush this step, you'll end up with seized chocolate that's grainy instead of glossy.
- Create the chocolate base layer:
- Spoon about a teaspoon of melted chocolate into each liner and gently tilt the tin so the chocolate climbs slightly up the sides, creating a thin cup that will cradle your filling. Ten minutes in the freezer is usually enough to set it firm enough that the next layer won't sink through.
- Mix your peanut butter filling:
- Combine the softened butter, peanut butter, powdered sugar, salt, and vanilla in a bowl and beat until the texture is smooth and thick—like a very thick frosting that holds its shape when you push a spoon through it. This should take just a minute or two of stirring.
- Layer in the filling:
- Roll small amounts into loose balls, flatten them slightly, and press gently onto your chocolate bases, leaving a tiny border around the edge so the top chocolate can seal everything together. Think of it as building something intentional rather than just dumping filling on chocolate.
- Seal with the chocolate top:
- Spoon the remaining melted chocolate over each filling-topped cup, making sure you cover it completely and seal the edges, then tap the tin gently on the counter to help everything settle and smooth out. This sealing step is what makes them feel polished and professional.
- Chill until set:
- At least 30 minutes in the refrigerator will give you firm, sliceable cups, though I usually leave mine overnight because I like them dense and chocolate-forward. The longer chill also makes them easier to remove from the liners without cracking.
 Save to Pinterest
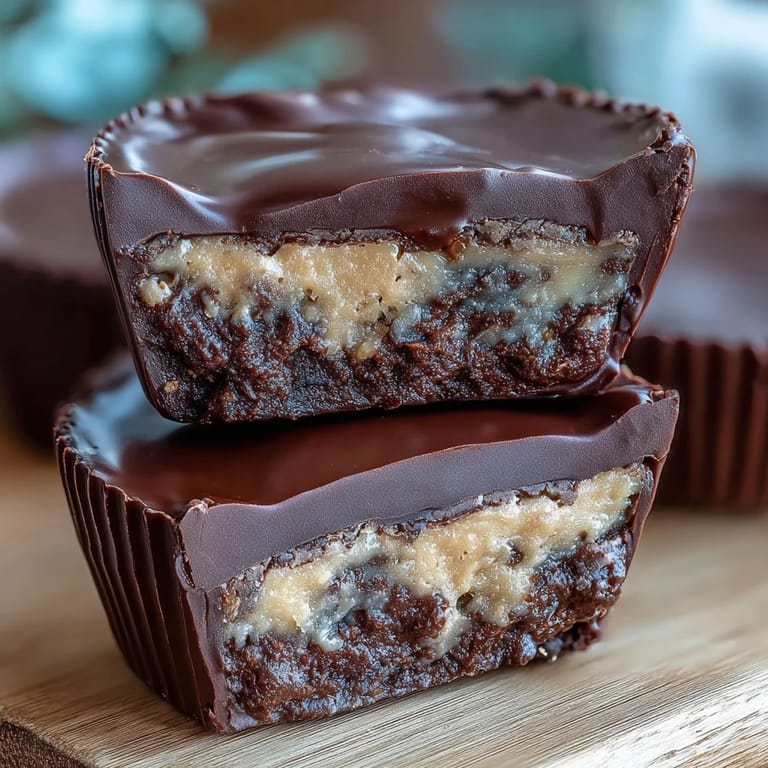
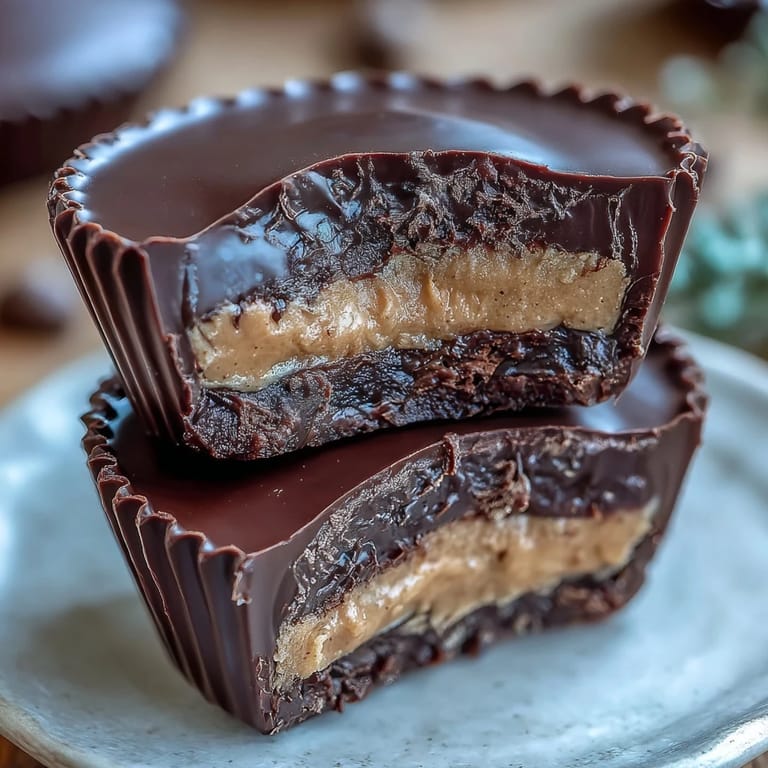
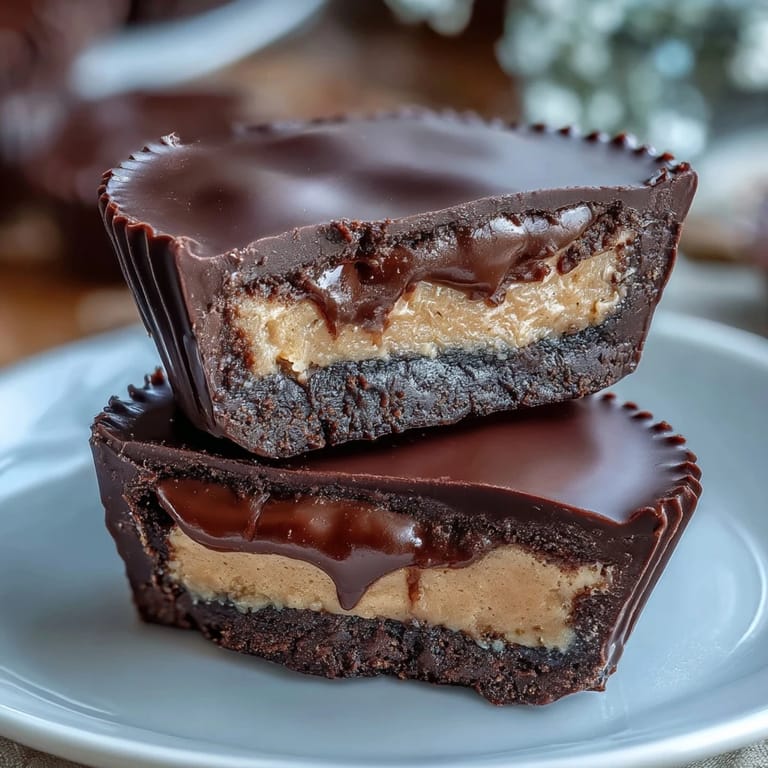
 There's a moment right before you bite into one of these where you can see the layers through the glossy chocolate shell—the dark exterior, that thin chocolate base layer, the creamy peanut butter middle—and it feels like you've accomplished something real. I've found that moment is when these stop being just candy and become the kind of homemade thing people remember and ask you to make again.
Why Dark Chocolate Makes All the Difference
The first time I made these with milk chocolate, I realized halfway through that I'd made candy instead of a treat—it was too sweet, one-note, and didn't have any complexity. Dark chocolate at 70% cocoa creates this beautiful tension with the salty, sweet peanut butter filling, making each flavor pop instead of blending into background sweetness. The cocoa solids also give these a more sophisticated mouthfeel that actually feels worth the effort to make yourself.
Storage and Keeping Your Cups Fresh
These keep beautifully in an airtight container in the refrigerator for up to a week, which means you can make them ahead and have an elegant homemade treat ready whenever you need one. I learned the hard way that leaving them out at room temperature causes the peanut butter filling to soften too much and the chocolate to develop a dull bloom, so refrigeration is non-negotiable. If you want them to taste closest to fresh, pull them out about five minutes before eating so they warm to that perfect texture.
Ways to Make Them Your Own
Once you've mastered the basic version, these cups become a canvas for your own preferences and experiments. I've tried them with almond butter and cashew butter, both of which create a slightly more delicate flavor that plays differently against the dark chocolate. Adding a tiny sprinkle of flaky sea salt on top of the final chocolate layer before chilling creates an intentional crunch and flavor surprise that guests always notice, and it takes exactly five seconds to do.
- For a vegan version, swap dairy-free butter for the regular butter and verify that your dark chocolate contains no animal products.
- Try adding a subtle layer of instant espresso powder mixed into your peanut butter filling if you want a sophisticated coffee-chocolate flavor.
- Remember that any additions should be added gently so you don't lose the balance between chocolate, peanut butter, and salt that makes these work.
 Save to Pinterest
 Making these homemade Reese's cups has become my favorite way to show people I care without being too fussy about it—they're impressive enough that they feel special, but straightforward enough that you don't spend all day in the kitchen. Once you taste the difference between homemade and store-bought, you'll understand why they're worth the small effort.
Recipe FAQs
- → What type of chocolate works best?
Use dark chocolate with 70% cocoa or higher for an intense, slightly bitter contrast to the creamy peanut butter.
- → Can I substitute the peanut butter?
Yes, almond or cashew butter can be used to create a different flavor profile while maintaining creamy texture.
- → How do I get a smooth chocolate coating?
Melting chocolate gently over simmering water or in short microwave bursts helps achieve a smooth consistency for easy spreading.
- → What is the purpose of chilling the cups?
Chilling sets the layers, allowing the cups to firm up for clean removal and proper texture.
- → Are these suitable for gluten-free diets?
Yes, as long as gluten-free chocolate and ingredients are used, these cups can be enjoyed gluten-free.