 Save to Pinterest
 The first time I made a pastel ombre cake, I was at home on a rainy afternoon and the kitchen felt especially cozy. I remember watching the clouds shift outside, imagining the contrast between their moody greys and the cheerful colors I’d soon bring to life. Somehow, whipping up something so bright seemed to lift the air and even tempted my neighbor to peek in, drawn by the butter and sugar aroma. The process felt almost like painting, gently blending hues as flour dusted the counter. Those pastel shades seemed to promise spring before the blossoms even arrived.
I’ll never forget last April when I brought this cake to a friend’s garden party and found myself frantically arranging edible flowers while the wind threatened to carry them away. There were laughs as a viola took flight, and somehow, the imperfect arrangement felt just right nestled under the backyard cherry tree. Sharing slices as bees hovered nearby made us all smile—this cake really does fit any moment worth savoring.
Ingredients
- All-purpose flour: Gives the cake structure and keeps the crumb light; sift for extra softness.
- Baking powder & baking soda: A duo for optimal rise and that tender bite; measure carefully, as too much can cause uneven domes.
- Unsalted butter: Be sure it’s truly room temperature—cold chunks won’t cream properly and can make batter grainy.
- Granulated sugar: Helps aerate the butter and delivers sweetness that lets pastel colors pop.
- Eggs: Room temp eggs blend smoothly; I always crack them into a bowl first to avoid rogue shells.
- Pure vanilla extract: A splash for aroma and rounding out flavors; don’t skimp on quality here.
- Whole milk: Adds moisture and softness; warming it slightly can prevent batter from curdling.
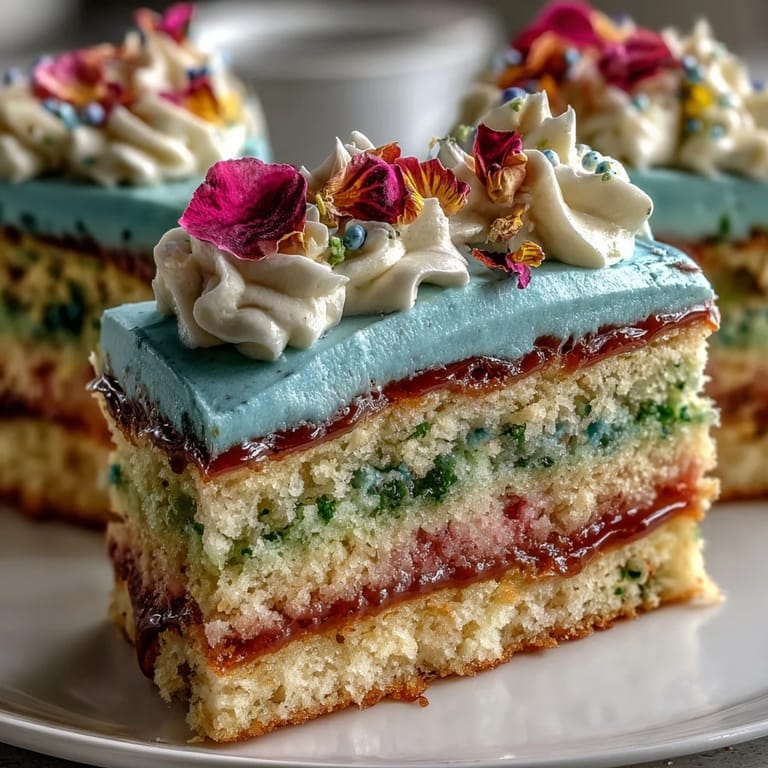
- Gel food coloring: Go gently—the color intensifies as you stir; gel stays vibrant without thinning the mix.
- Powdered sugar: Sift well to avoid lumps in the buttercream—skip this and frosting gets gritty.
- Edible flowers: Choose fresh, organically grown blossoms you know are safe; handle gently to prevent bruising.
Tired of Takeout? 🥡
Get 10 meals you can make faster than delivery arrives. Seriously.
One email. No spam. Unsubscribe anytime.
Instructions
- Prep Your Pans:
- Grease and line the pans thoroughly—parchment should hug the bottom, and even the rims deserve attention for easy unmolding.
- Mix Dry Ingredients:
- Whisk flour, baking powder, baking soda, and salt together; breathing in the floury scent always clues me in to spring baking.
- Cream Butter and Sugar:
- Beat them until pale and fluffy—listen for the rhythmic swish, and scrape down the sides often so nothing gets missed.
- Add Eggs and Vanilla:
- Each egg must disappear fully before adding the next; the vanilla’s aroma is my cue that things are coming together.
- Alternate Dry and Wet:
- Start and finish with dry, mixing gently to keep the batter tender—don’t rush or it’ll toughen.
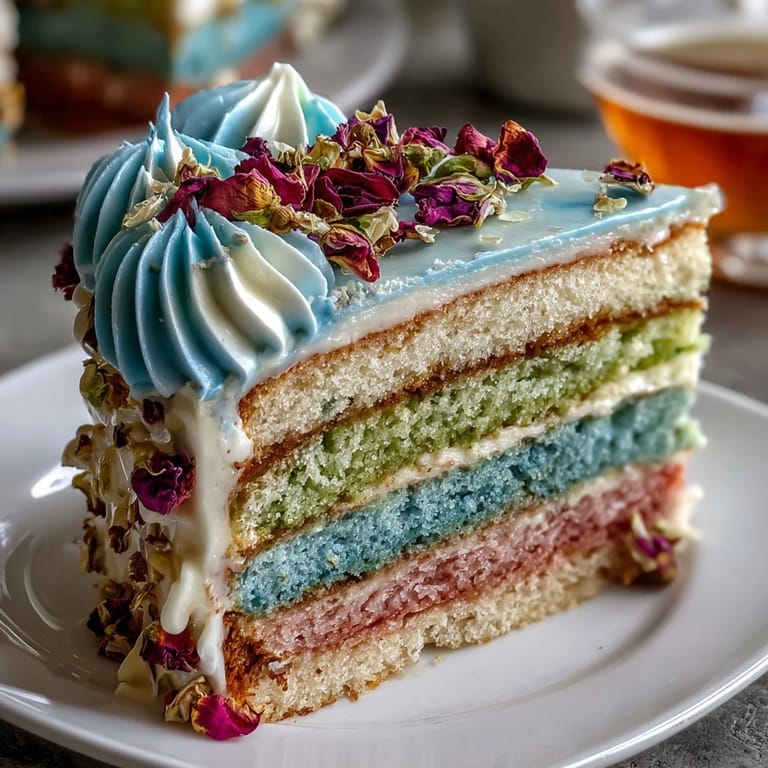
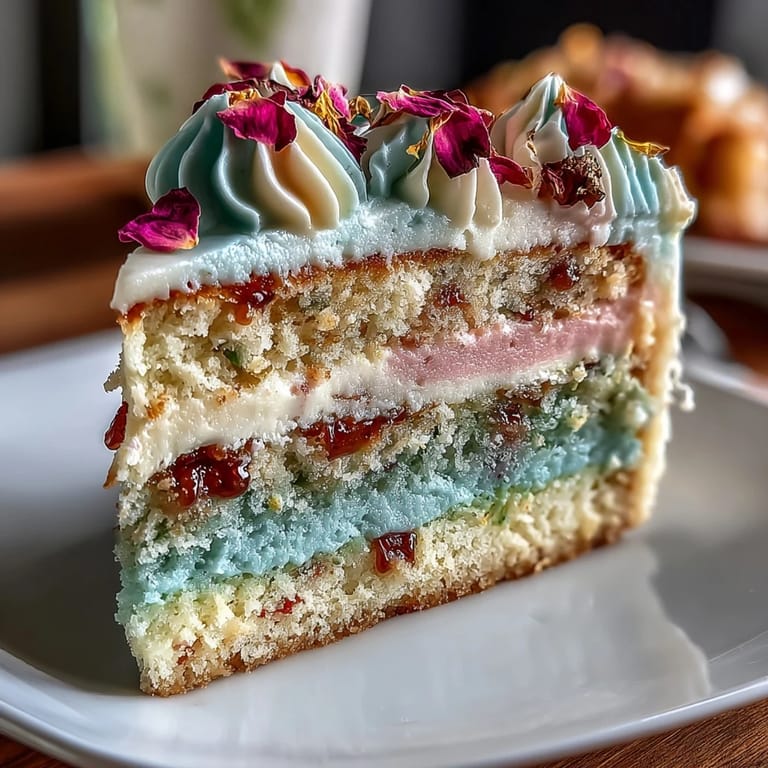
- Divide and Color Batter:
- Spoon into three bowls and tint each a different pastel; swirling color feels like watercolor, so go slowly for gradients.
- Bake Layers:
- Bake until edges pull slightly from the sides and a toothpick comes out clean; cooling on racks avoids any soggy bottoms.
- Make Buttercream:
- Beat butter until creamy, then add powdered sugar, vanilla, and milk—start slow, as clouds of sugar tend to escape.
- Tint & Assemble:
- Divide frosting, gently swirling in pastel shades; layering and crumb coating keeps things neat before the ombre finish.
- Decorate with Flowers:
- Arrange edible blossoms just before serving for freshness, letting their colors guide your final flourish.
 Save to Pinterest
 When we finished the cake last spring, my little niece reached up and touched the flower crown, then giggled as she tasted a petal—her delight made me realize the cake was more than a dessert, it was an invitation to play and celebrate together.
Making That Ombre Magic
Forget worrying about perfect shade transitions; blending frosting with a spatula makes every cake uniquely beautiful. My favorite moment is spinning the turntable, watching the buttercream swirl and soften up the whole room’s mood. If you do make a mistake, a flourish of flowers will cover any uneven spot—they’re a forgiving final touch. The kitchen always feels more alive when there’s color everywhere.
Choosing Edible Flowers Wisely
After almost grabbing a non-edible bloom once, I learned to double check every flower’s label. It’s best to shop at a trusted market, and always rinse gently to remove any stray dust. Sometimes arranging them, I get lost in their scent—not all wildflowers are safe, so stick to familiar varieties when in doubt.
Final Flourishes and Save Your Cake
I always keep extra buttercream ready for touch-ups since transporting cakes can shift layers. Even if your ombre effect isn’t perfect, a cascade of fresh flowers hides all flaws and adds gorgeous height. Don’t forget cake slices taste even better with a spoonful of leftover frosting on the side.
- Chill the cake before slicing for stamp-straight layers.
- Use an offset spatula for smooth finishes.
- Add flowers just before serving so they stay perky.
 Save to Pinterest
 Any spring cake adventure is brighter with a splash of pastel colors and fresh blooms. Invite friends, share slices, and let the cake become part of the festivities.
Recipe FAQs
- → How do I achieve the ombre pastel effect?
Divide batter and frosting into portions and tint each with different pastel shades using gel food coloring. Layer and frost to blend colors seamlessly.
- → What edible flowers are safe to use?
Choose organic flowers labeled as edible, such as pansies, violas, roses, or chamomile. Always check suitability and avoid those with pesticide exposure.
- → Can I make this cake vegan?
Yes, replace butter, milk, and eggs with plant-based alternatives and ensure edible flowers are vegan and organic.
- → What tools are essential for preparation?
You will need three 8-inch round cake pans, electric mixer, mixing bowls, spatulas, wire rack, and optionally a cake turntable for smooth frosting.
- → How many servings does this cake yield?
The finished cake serves up to 12 guests, making it ideal for gatherings and parties.
- → Are there any allergens I should be aware of?
This cake contains wheat, eggs, and dairy. Edible flowers may trigger allergies in sensitive individuals; check individual suitability.