 Save to Pinterest
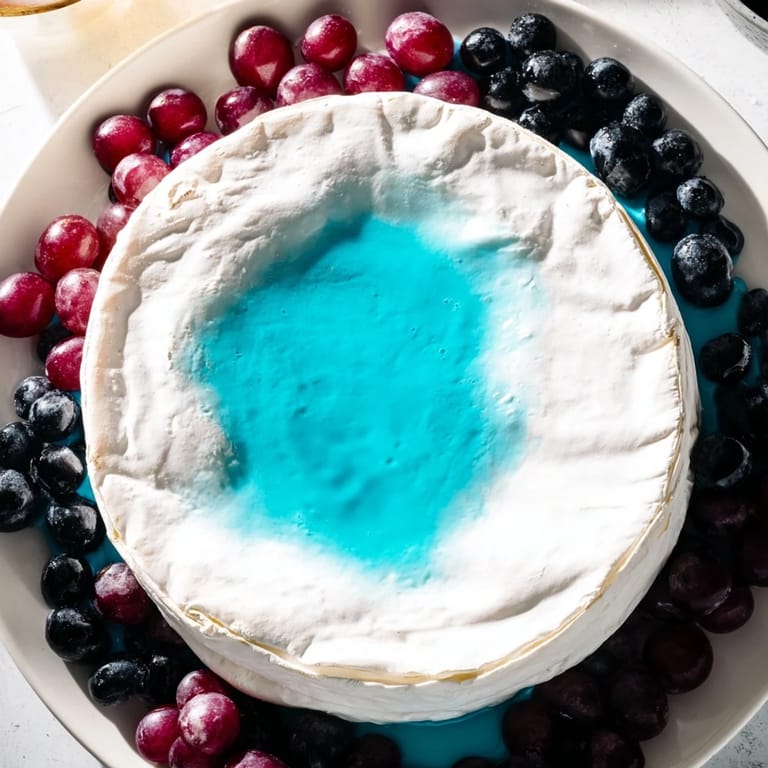
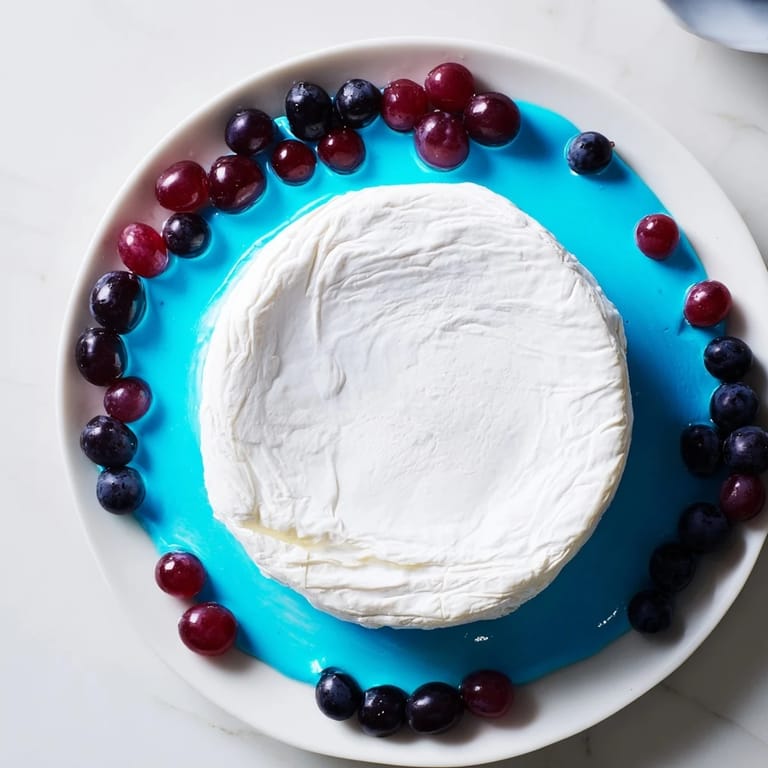
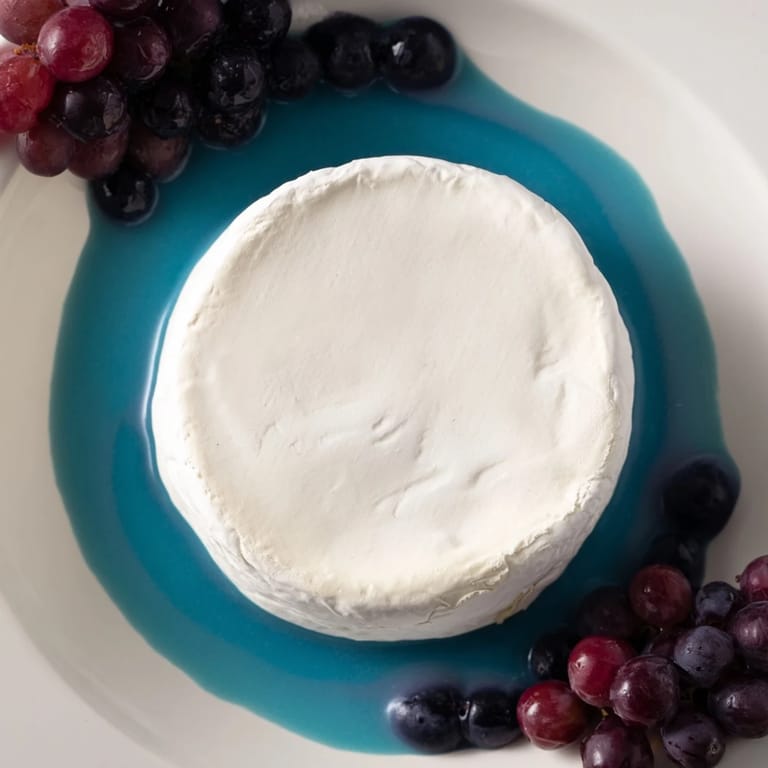
 I first made the Floating Island for a dinner party when I realized I'd spent more time planning the menu than actually preparing anything. With just fifteen minutes before guests arrived, I needed something that looked like I'd worked for hours but required almost no cooking. The moment I centered that wheel of Brie on the platter and poured the yogurt around it like a tiny edible ocean, I knew I'd stumbled onto something special. What started as kitchen improvisation became the dish everyone asked about for months afterward.
I remember standing in the kitchen while my friend Sarah watched me assemble this for the first time, skeptical that a cheese wheel could be elegant. As I spooned that vivid blue yogurt around it, her expression shifted completely—suddenly it wasn't just cheese and yogurt, it was a centerpiece with personality. When people started tearing pieces off and building their own bites, the island became the conversation starter of the evening, and I realized presentation really does matter when you're feeding people you care about.
Ingredients
- Soft-ripened cheese wheel (Brie or Camembert, about 500 g): Choose one that's ripe but still holds its shape, since room temperature will soften it slightly as you plate it and guests dig in.
- Plain Greek yogurt (400 g): The tanginess cuts through the richness of the cheese and provides the perfect canvas for your blue.
- Lemon juice (1 tbsp): A squeeze of brightness that ties the whole thing together and keeps the yogurt from tasting flat.
- Garlic powder (1 tsp): Don't skip this—it adds savory depth without overpowering the subtle flavors of the cheese.
- Salt (1/2 tsp): Taste as you go and adjust to your preference; different cheeses have different salt levels.
- Blue food coloring (gel or natural): Start with less than you think you'll need, because the color deepens as you stir and it's easy to go overboard into an unappetizing shade.
- Seedless black or red grapes (250 g): Mix colors if you can find them, or stick with deep red for maximum drama against the blue.
- Fresh herbs (optional): A small sprig of rosemary or thyme on top of the cheese adds a final flourish.
Tired of Takeout? 🥡
Get 10 meals you can make faster than delivery arrives. Seriously.
One email. No spam. Unsubscribe anytime.
Instructions
- Build your island:
- Set the cheese wheel in the center of your serving platter like you're placing a sculpture. Make sure the platter is large enough that you'll have plenty of room around it for the yogurt sea.
- Mix the dip base:
- Whisk together Greek yogurt, lemon juice, garlic powder, and salt in a medium bowl until completely smooth. Taste it at this stage and adjust the seasoning—you want it to taste good on its own before you add color.
- Create the water:
- Add blue food coloring very gradually, stirring well between each drop. You're aiming for something that looks like a calm lake or a Mediterranean dream, not a swimming pool.
- Pour your sea:
- Carefully spoon the yogurt around the cheese in an even layer, letting it settle naturally around the base. Work slowly so you don't splash it onto your cheese island.
- Frame with grapes:
- Arrange the grapes around the outer edge of the yogurt, creating a dark border that makes the whole thing feel intentional and composed. A few scattered grapes on top of the cheese never hurt either.
- Finishing touches:
- If you're using fresh herbs, place a small sprig or two on the cheese island. Step back and admire what you've created before people arrive.
 Save to Pinterest
 There's something magical about watching people's faces light up when they see this for the first time. It's not just food; it's a moment where everyone feels like they're in on something clever, and suddenly the evening feels special before anyone's even tasted a bite.
Scaling Up for Crowds
If you're feeding a larger group, the beauty of this dish is that it scales effortlessly. Use a larger serving platter and increase the yogurt proportionally, keeping the cheese wheel as your central focal point. I've made versions for twenty people using the same technique, and it holds up beautifully throughout an entire party.
Flavor Variations to Try
Once you understand the basic structure, you can play with it endlessly. A drizzle of truffle oil or good quality olive oil on the yogurt adds luxury, while a swirl of pesto introduces an herbaceous twist. Some versions I've seen use roasted red pepper purée mixed into the yogurt for warmth and a slightly sweet note that pairs beautifully with the cheese.
Serving and Pairing Ideas
This works best surrounded by an array of textures—crispy crackers, toasted bread slices, and maybe some breadsticks for people who want to scoop generously. It pairs beautifully with a crisp Sauvignon Blanc or even a light rosé if you want something refreshing alongside it.
- Have small plates or napkins nearby because people will want to build their own bites rather than eating over the platter.
- Serve this in the first hour of your gathering while the presentation is at its peak and the cheese is still perfectly textured.
- Consider making it vegan by swapping in a good plant-based cheese wheel and coconut or cashew yogurt if you have guests with dietary needs.
 Save to Pinterest
 What I love most about this recipe is that it proves you don't need hours in the kitchen to create something memorable. In fifteen minutes, you've built an edible artwork that tastes as good as it looks.