 Save to Pinterest
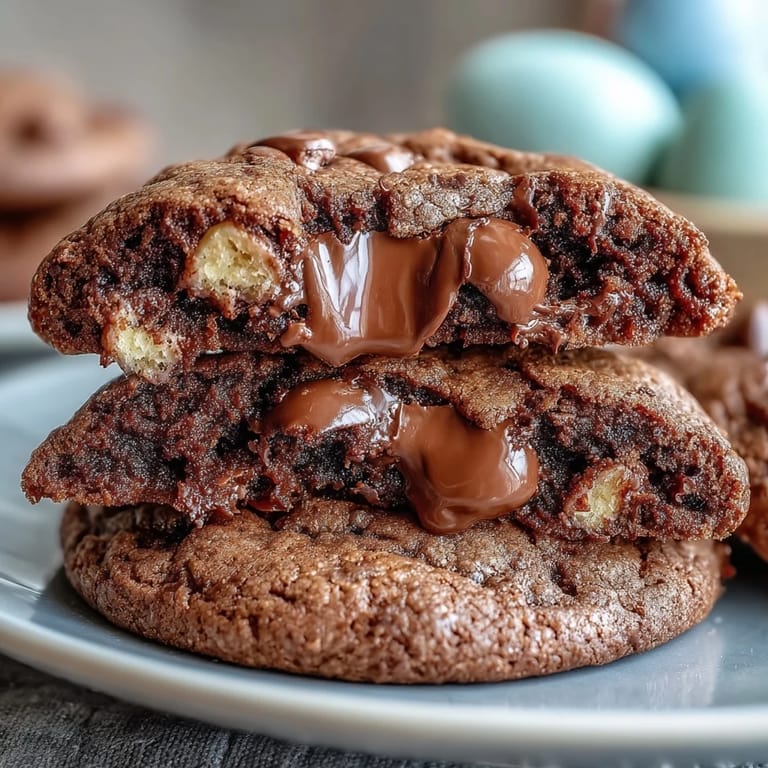
 My sister texted me a photo of Cadbury Mini Eggs on a grocery store shelf in early March, and I knew immediately what we were making for Easter brunch. There's something about those candy-coated chocolate eggs that reminds me of childhood hunts in the backyard, but now I wanted to bake them into something warm and chewy. The first batch came out of the oven golden and still soft in the middle, with little pockets of melted chocolate and those vibrant egg pieces creating bursts of color throughout. My nephew saw them cooling and declared them "better than the eggs we hunted," which felt like the highest compliment possible.
I made these for a neighborhood potluck last April, and watching three different people sneak back to the dessert table for a second cookie told me everything I needed to know. One neighbor actually asked if they were store-bought because she couldn't believe how simple they looked yet tasted so intentional. That's when I realized these aren't just cookies—they're a conversation starter that happens to be delicious.
Ingredients
- All-purpose flour (2 1/4 cups): The foundation that gives structure without being dense; sifting isn't necessary here, but make sure your flour is aerated so you don't accidentally pack it.
- Baking soda (1/2 teaspoon): This is your secret to that perfect edge-to-center texture contrast—too little and you lose the lift, too much and they spread too thin.
- Salt (1/2 teaspoon): Never skip this; it's the quiet ingredient that makes the brown sugar and vanilla sing louder.
- Unsalted butter (1 cup, softened): Room temperature is non-negotiable here because cold butter won't cream properly with the sugars, leaving you with dense cookies instead of fluffy ones.
- Packed light brown sugar (3/4 cup): This gives you moisture and chewiness; pack it gently when measuring so you get the full amount without crushing the sugar crystals.
- Granulated sugar (1/2 cup): The mix of brown and white sugars creates complexity; using only one type changes the entire texture and flavor profile.
- Large eggs (2): These bind everything together and add richness, so make sure they're truly room temperature before mixing.
- Pure vanilla extract (2 teaspoons): Quality matters here; cheap vanilla makes the whole batch taste a bit flat and one-dimensional.
- Semi-sweet chocolate chips (1 cup): I've learned through trial that semi-sweet balances the sweetness of the Mini Eggs without overpowering them, though you can absolutely swap for your preferred chocolate type.
- Cadbury Mini Eggs, roughly chopped (1 1/2 cups): Chopping them by hand instead of pulsing in a food processor keeps some larger pieces intact, which creates better texture variation in each bite.
Tired of Takeout? 🥡
Get 10 meals you can make faster than delivery arrives. Seriously.
One email. No spam. Unsubscribe anytime.
Instructions
- Set Your Stage:
- Preheat your oven to 350°F and line two baking sheets with parchment paper, which takes exactly two minutes but saves you from cookies sticking and burning on the bottom. Having everything ready before you start mixing means you'll stay calm and focused throughout the process.
- Build Your Dry Team:
- Whisk together the flour, baking soda, and salt in a medium bowl, letting the whisk do the work of aerating so you don't overwork the dough later. Setting this aside lets you grab it quickly when the wet ingredients are ready, keeping momentum going.
- Cream the Base:
- Beat the softened butter with both sugars until the mixture looks light, fluffy, and slightly pale—this usually takes about 2 to 3 minutes with an electric mixer. You're incorporating air into the butter, which is what makes these cookies tender rather than dense.
- Introduce the Eggs:
- Add one egg at a time, beating well after each addition so the mixture stays smooth and emulsified. If you rush this step, the dough can look curdled and broken, which affects how the final cookies bake.
- Marry Wet and Dry:
- Gently fold the dry ingredients into the wet mixture using a spatula, stopping as soon as you don't see flour streaks anymore—overmixing toughens the dough. This is one moment where restraint actually creates a better result.
- Fold in the Jewels:
- Use your spatula to fold in the chocolate chips and chopped Mini Eggs, distributing them as evenly as possible so every cookie gets both chocolate and candy pieces. This is the moment where the plain dough transforms into something festive and special.
- Shape and Place:
- Scoop tablespoon-sized portions of dough onto your prepared baking sheets about 2 inches apart, leaving room for gentle spreading. If you want extra visual impact, press a few whole Mini Egg pieces into the top of each dough ball before baking.
- Watch the Oven:
- Bake for 10 to 12 minutes until the edges are lightly golden but the centers still look slightly underdone—this is the exact window where cookies go from chewy to cakey. Set a timer because even one minute too long changes everything.
- Cool with Patience:
- Let the cookies sit on the hot baking sheet for 5 minutes so they firm up slightly, then transfer them to a wire rack to cool completely. This resting time on the sheet is when they set their chewy center texture.
 Save to Pinterest
 My daughter sat at the kitchen counter watching me pull a batch from the oven, and she asked if she could pick out all the Mini Egg pieces because they were "too beautiful to eat." I let her examine one for a solid minute before she finally bit into it and that debate became irrelevant. Those small moments—where food becomes an experience instead of just fuel—are why I keep making these.
Chocolate Considerations
I've experimented with swapping the semi-sweet chips for milk chocolate when I wanted a sweeter, more indulgent cookie, and for dark chocolate when I was trying to balance the Easter candy aspect. Dark chocolate creates an almost sophisticated contrast with the bright sweetness of the Mini Eggs, while milk chocolate makes the whole thing feel like a candy shop exploded in your mouth. The semi-sweet version hits a middle ground that works for almost any crowd, but once you know your preferences, you can adjust without hesitation.
Storage and Make-Ahead Magic
These cookies actually improve slightly on day two as the flavors settle and the texture becomes more uniformly chewy, which means you can confidently make them the day before your Easter gathering. I've learned that airtight containers work better than plastic bags because bags let them dry out faster, and I always layer parchment paper between stacks to prevent sticking. They freeze beautifully for up to three months, which means you can bake these in March and still have fresh Easter cookies in April if needed.
Decorating and Presentation
The most visually stunning batch I made involved pressing extra Mini Egg pieces into each cookie before baking, which created little peaks of color that caught the light beautifully. I've also tried arranging them on tiered cake stands with fresh spring flowers around the base, which turns a simple cookie plate into an actual centerpiece. Here's my final collection of observations from making these repeatedly:
- Pressing whole Mini Eggs on top before baking keeps them vibrant and glossy, while folding them in gives a more subtle, integrated surprise throughout.
- Room temperature ingredients make a measurable difference in how smoothly the batter comes together, so don't skip the warming step.
- If you're making these more than two days ahead, freeze them instead of keeping them at room temperature, which preserves that tender, chewy texture better.
 Save to Pinterest
 These cookies have become my spring tradition, the recipe I reach for when I want to feel like I've created something thoughtful without spending hours in the kitchen. There's genuine joy in baking something colorful and celebratory, especially when it tastes as good as it looks.